Overview
For this assignment, you are to build a musical chord generator using the RC200E touchscreen and audio output facilities. The user will see a pattern something like this:
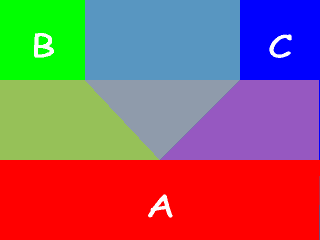
When the user presses the area marked “A” in the diagram, a tone of a certain frequency will play; pressing the “B” zone plays another tone, and pressing the “C” zone plays a third tone. Pressing the area between the A and B zones plays a mixture of the A and B tones; pressing the area between the A and C zones plays a mixture of the the A and C tones, pressing the area between the B and C zones plays a mix of those two tones, and pressing the area in the center plays a mix of all three tones. By picking appropriate values for the frequencies of the three tones, you can play various musical intervals and chords.
Procedure
-
Draw the image.
Pick seven colors to use for the display. Make zones A, B, and C be a set of primary colors, such as red, green and blue, and make the colors in between be mixtures of those colors. Draw the pattern shown using the same technique you used for the seven-segment display image in Laboratory 4. Look at the next step before you pick your colors.
-
Respond to touchscreen input.
Use the Pal Touchscreen API to detect when and where the user presses the touchscreen. Highlight the zone where the user touches the screen either by making it darker or lighter than it was before. (If you started with high-intensity color components, you could halve each color channel’s intensity, for example.)
-
Study Digital Audio
Study my Audio Sampling Laboratory to become familiar with the concepts of sound frequencies, sampling rate, and bits per sample. Also, look at my Fourier Synthesis program to help understand the issues involved in mixing audio signals.
-
Generate Tones
Study the Pal AudioOut API to see how to generate audio output. You need to provide a sequence of intensity levels at the correct rate in order to produce a sound. Note that once you set the sampling rate, you can call PalAudioOutWrite() every clock cycle, and it will block until the right time for emitting the next sample arrives.
You will work with combinations of pure tone sine waves for this project. Since you cannot reasonably do trigonometric calculations on the FPGA, you will have to generate the sine waves using lookup tables that you can generate using a program that is available for this purpose: Generate Audio Samples. Note that this is a command-line program at this point. You have to open a console window to run it, and the program’s output has to be captured in a file, which you can then #include into your Handel-C project.
More Information
Picking Colors.
There is a program you can use to look at various combinations of colors, and see their hexadecimal RGB values. The program is intended for people doing Web Design, and is probably overkill for this project. But you can use it to see what colors are clearly different from one another and to get their hexadecimal encodings.
Picking Tone Frequencies.
Like the colors, the tones you use can be anything so long as they are clearly distinguishable from each other. But you can pick tones that bear a musical relationship to each other to make things a little more pleasant to listen to. For example, you could pick a low note for zone A that corresponds to a note on the scale, and then pick a note that is three musical “steps” above that for zone B, and one that is five steps above it for zone C. For example, middle C for zone A (261 Hz), G above that for zone B (392 Hz), and F above that for zone C (349 Hz). You can find the frequecies for notes on the web at the Michigan Tech Physics Department web site, among other places.
Working With Lookup Tables
You are going to pick a sampling rate for the tones, probably 48 KHz because that is the default value for the Pal AudioOut macros. Every 1/48,000 of a second, you have to write a new intensity value using PalAudioOutWrite(). For monophonic sound, you can just write the same value to both the left and right channels each time.
Here is an example showing how to run Generate_Audio_Samples:
The -f option specifies the frequency of the tone you want to generate, in this case 261 Hz (middle C). You can use other options to change the sampling rate and other parameters, but by default, the program assumes a sampling rate of 48 KHz and 20 bits per sample, the default settings for the RC200E kits.
The command above saves the program’s output in a file, which can be added to your project and #included in your Handel-C program. For example, here is a program that uses the file generated above to play a 261 Hz tone continuously:
You will need to study the file generated by Generate_Audio_Samples to understand fully how to use it.
When you generate intervals and chords, you will need to pay attention to:
- the number of bits per sample
- the fact that you are working with signed values
- that the number of bits needed to represent the correct sum of intensities is greater than the number of bits per sample in the audio system
- that the sound intensity should remain constant when combining multiple tones
For example, when you add two 20-bit intensities, you will get a 21-bit sum that can be twice as large as the values you want to work with: divide the sum in half by dropping the rightmost bit to correct the value. When combining three tones, you will need to be creative to generate mixed intensities that have the correct level while avoiding division by three. Consult the How To Divide By Three web page for more information.